Halloween candy is pretty much in our faces at stores starting in August these days, so it’s a constant reminder that this ghoulish day is coming up and many sweet treats will be floating around. Giving in to temptation is easy, especially when the kids bring home bags of Halloween treats or there are boxes of treats left over because not as many trick or treaters came knocking as was anticipated. Having a party for this fun day? Consider making some easy DIY recipes that will wow your guests. Halloween 2016 will be remembered by all when you show off your skill at making homemade candy and other sweet confections.
You don’t need to be a star in the kitchen to pull these recipes off. Anyone can do them, and even the kids can help if they want. Perhaps these aren’t treats you can hand out because many people are leery of homemade treats their kids get in their loot bags (for safety reasons), but your friends and family are sure to enjoy the ghoulish sweets you cook up. Below are a few recipes to get your started.
Easy Halloween Recipes
Coconut Mounds
This is a really easy recipe, especially the filling. Chewy coconut covered in chocolate – who doesn’t love that combination? The fun with this recipe is that you can shape the filling anyway you like: mounds, squares, or have fun and create your own spooky shape. Use your imagination!
You will need: One (15 ounce) can coconut milk, Two cups unsweetened shredded coconut, ¼ cup + 1 tablespoon coconut flour, ¼ cup honey. Vegans can use maple syrup instead, Two (9 ounce) bags of dark chocolate.
In a bowl, mix the coconut milk, shredded coconut, coconut flour, and honey (or maple syrup). Mold the mixture into bars (or shape of your choice) and put on two baking sheets that are lined with parchment paper or silicone baking mats. Place the baking sheets in the freezer and chill for at least an hour.
While waiting for these to chill, melt the chocolate chips in the microwave or on the stove using a double boiler. If you melt them directly on the element in a pot, use low heat and stir constantly. Take the frozen bars out of the freezer and dip them into the chocolate. Allow the chocolate to harden. Keep them stored in the refrigerator or freezer because they are best served cold.
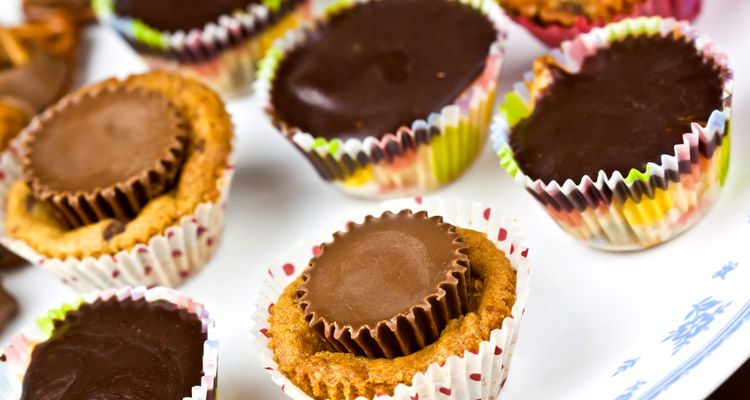
At Home Reese’s Peanut Butter Cups
This recipe is super simple to make, in only 15 minutes, and they taste so good. And you know exactly what’s going into them, which makes them so much better for you to eat.
You will need: 1 package of crushed graham crackers (about 10 sheets), 1 cup powdered sugar, 1½ cup melted peanut butter, 3 cups milk chocolate chips.
Line a muffin tin with cupcake liners. In a mixing bowl, combine the crushed graham crackers, powdered sugar, and peanut butter. Melt the chocolate chips in a microwave or on the stove in a pot. Add a large teaspoon of the mixture to the bottom of each cupcake liner and spread. Next add a full tablespoon of the peanut butter mixture, and finally, add a large teaspoon of the melted chocolate. Spread evenly over the peanut butter. Put this in the fridge for an hour, when it should be firm and ready to eat.
Gluten Free Vegan Kit Kat Style Bars
Even vegans have a hankering for something sweet every once in a while, so for those following a vegan diet in your life, whip up a batch of these treats that are dairy and gluten free.
For the fluffy center you will need: 1 cup cashews, ¼ cup raw cocoa powder, 1 tsp vanilla, 2 tsp agave syrup, ¾ cup water, 2 Tbsp coconut oil.
Other ingredients needed for this recipe:
#1 box of Rice Chex cereal (a little hard to find so you may have to visit a few grocery stores or try getting them online)
#2 cups melted non-dairy chocolate
To make the fluffy chocolate center, place all of the ingredients into a blender and pulse until smooth and fluffy. This might take three to five minutes. Put it in the fridge while getting the other parts prepared.
Coat an 8×8 parchment paper-lined pan with a thin layer of chocolate. Line this with Rice Chex cereal in a fairly controlled pattern. The third layer is the fluffy chocolate middle, but use the back of the spoon so it spreads more evenly. Freeze for at least 20 minutes. Add another layer of cereal; then coat with the final layer of chocolate and place in the freezer again for about 15 minutes.
Take out of the freezer, and with a knife, mark where you will be making the incisions. Cut about half way through and then freeze for another 20 to 30 minutes. Remove the parchment paper and cut through the candy all the way. Melt the rest of the chocolate and dip the sides of the candy into the chocolate. Freeze again until set. It’s a bit more time consuming than the other two pieces but well worth it.
Sources:
“HOMEMADE (HEALTHIER) MOUNDS BAR RECIPE,” Happy Healthy Mama web site, August 17, 2016; http://happyhealthymama.com/homemade-mounds-bar-recipe.html, last accessed October 19, 2016.